Photo editing
Removing background from pictures is really common task. This is not something only bloggers have to do, there are lots and lots of times you will need to remove background from a picture. For example if you are creating Presentations, writing articles, creating videos, selling stuff online and much more! It is really useful to know how to do this with Photoshop for example, but not everyone is familiar with this software. On the top of everything it costs a lot.. Removing a single-color background isn’t that hard to be done, but removing complex background from photo seems like an impossible task!
Or is it impossible ? Here I will share with you two methods i usually use to get the job done.
Set Transparent Color in MS Office
This method works only for single-color backgrounds, it is a bit dull. However sometimes this is all we need. It is really fast and easy method which can save us in many cases. The best part of it is that you can do it in MS Office 2007!
Take note that if there is more than one color in the background this won’t work even if it looks like everything is single color. If we have some problems there are more solutions below. Now without further ado let’s start with the trick:
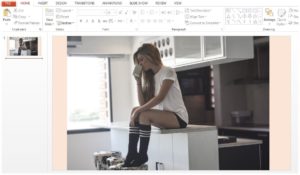
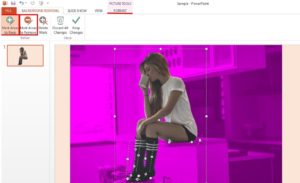
- We have to drop our image in PowerPoint (it will work as well in Word or Excel).
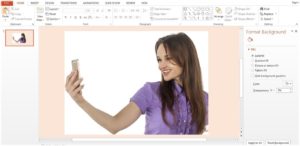
- Now as our image is in PowerPoint we have to click on it and go to FORMAT tab under PICTURE TOOLS, there we Click on Color and from the drop down menu we select Set Transparent Color.
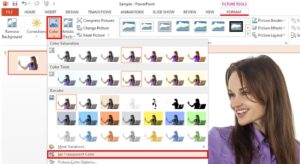
- Now our mouse will turn into little pen or something like that, we just have to click on background. Thats it! our picture is now with transparent background. We just have to right click on it and Save it As Picture..!

Using Online Tool for background removal
Now we will try to remove complex background from a picture. In the example we will be using picture of girl having cup of coffee. It has really complex background and would be impossible for us to use first method.
There are lots of Online Tools that can get the job done. I will share with you 3 of them.
Clipping Magic
This is great tool that works very good and we can see the result in real time.
How it works? Well we just drag and drop our picture in the site, then we will see the main window where the Magic happens. Site will automatically explain in depth how to use it, but in a nutshell we have green and red tool in upper left corner of the screen. With green one we mark all we want to keep and then with the red one we mark what we want to get rid of. The result will be something like this: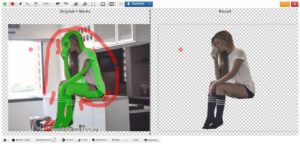
The tool is really good but if we want to download the picture we’ve just created we have to pay a subscription which is not cool..
AutoClipping
This site is almost identical with Clipping Magic, but provides us with opportunity to Download our picture for free. However there is a little catch, if we want free picture we have to register, and there is a limitation – up to 0.5 megapixel images, which is not that bad in most of the cases.
Here is the interface: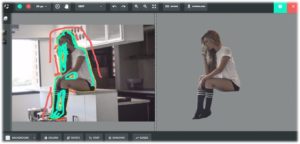
EditPhotosForFree
This one works almost the same way as other two. The problem is that it is not interactive and you can’t see your progress in real time. Also I personally find it harder to get good results, it is not so well optimized. However it is free and that’s huge advantage!
Here is the interface: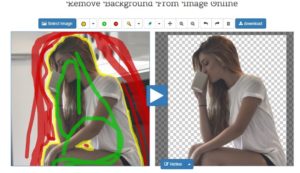
Remove background using Microsoft Office 2010-2016!
This is by far my favorite method. It is really good because it works fast and is very well optimized for the job. If you have MS Office I will recommend it to you!
Now let’s see how to do it:
- Firstly we have to drag and drop our image in PowerPoint or Word or Excel..
- As our image is in PowerPoint we have to click on it and go to FORMAT tab under PICTURE TOOLS. In the upper left corner we will see Remove Background, just click on it!

- Now some parts of our picture will become violet this are parts that will be removed. Now we also have a new frame which we will adjust accordingly to what part of our picture we want to keep.

- As we can see there are some mistakes, to correct them we will use the markers which are in the upper left corner. We will Mark Areas to Keep (they will look as lines with + symbol on them) and Mark Areas to Remove ( they will look as lines with – symbol on them)
- Now we just have to click on Keep Changes and then right click on image to Save it as Picture..!