

AutoCAD’s reference point for scaling and rotation feature allows you to resize and reorient objects in your drawings based on a specified reference distance or angle. This can be very useful for a variety of tasks, such as:
- Scaling a door block to fit a specific opening in a wall
- Rotating a group of lines to a particular angle
- Aligning an object to another object in the drawing
- Scaling an object to fit between two existing objects
- Rotating an object in reference to another existing object in the drawing
- And many many more!
Reference scaling and rotation is a simple but powerful tool that can save you time and improve the accuracy of your drawings. In this article, we will show you how to use this feature to scale and rotate objects accurately and efficiently in AutoCAD.
How to use reference point for Scaling in AutoCAD
Scaling objects in AutoCAD is quite easy, the process is straightforward and intuitive. First, you trigger the scale command, then you select the objects(s) to scale, and finally, you type in the desired scale factor and hit Enter. To increase the size of the selected object, you type in a scale factor greater than 1 and to decrease its size enter a scale factor between 0 and 1.
To scale an object in AutoCAD using a reference point, follow these steps:
- Select the object(s) you want to scale.
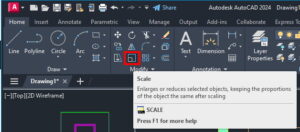
- Click the Scale button on the Modify panel of the Home tab. Or type on the command line SC
- AutoCAD will now prompt to Specify base point:
- After selecting a Basepoint, the program will ask you to Specify scale factor or [Copy/Reference]: Enter r for the reference point.
- Select the two points that define the reference distance. (For example, the 2 points that define a door width)
- You will notice that the object changes its size along with the mouse movement. Now select the desired endpoint for the scale to be completed.
Note: At step 6, instead of dragging the cursor you can specify the scale factor using two reference points from the screen by typing on the command line p. This is useful when objects are not aligned.
How to use reference point for rotating objects in AutoCAD
Rotating an object in AutoCAD is also a very simple and intuitive process. First, you select the object specify the base point, and then enter the angle of rotation. However, often we are not sure what the angle of rotation needs to be, in these situations, it would be best to use reference points on the screen.
To rotate an object in AutoCAD using a reference point, follow these steps:
- Select the object(s) you want to rotate.
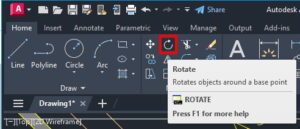
- Click the Rotate button on the Modify panel of the Home tab. Or type on the command line RO.
- AutoCAD will now prompt to Specify base point:
- After selecting a Basepoint, the program will ask you to Specify rotation angle or [Copy/Reference] <0>: Enter r for the reference point.
- Select the two points that define the reference line. (For example, the 2 points that define a door width)
- Select the two points that define the reference angle.
- You will notice that the object rotates along with the mouse movement. Now select the desired endpoint for the rotation to be completed.
Final Thoughts
Reference scaling and rotation is a simple but powerful tool that can help you create more accurate and efficient drawings in AutoCAD. By using reference points to scale and rotate objects, you can ensure that your drawings are consistent and up to the highest standards.
I encourage you to experiment with reference scaling and rotation to see how it can improve your workflow. If you have any questions, please leave a comment below.
I hope you find this post a value, you can check our other AutoCAD Articles to find even more interesting tips and tricks.