

AutoCAD Points are some of the most useful objects but are often overlooked. They are used by default when working with measure and divide tools and many more. Maybe the reason for their poor use is their point style? AutoCAD points are not suitable for the tasks you have?
Today we are going to look at How to add Points in AutoCAD and How to change AutoCAD Point Style!
How to add Points in AutoCAD
Points in AutoCAD are added by using the POINT command or the short keyboard version PO (Create Custom Keyboard Shortcuts in AutoCAD!).
When triggered AutoCAD prompts to specify a Point, this can be done by clicking somewhere on the screen, or entering the desired coordinates.
AutoCAD Points are automatically created when using Measure and Divide tools by default.
To Create multiple points without the need of triggering the command several times, you can use the dedicated Multiple Points tool, located on the Home ribbon, under Draw drop-down menu as shown below.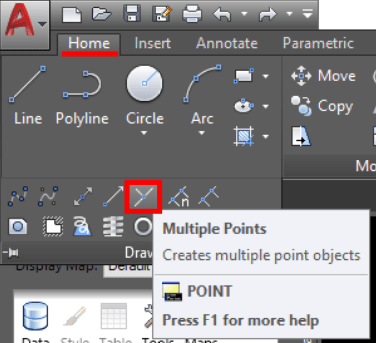
To quickly add Multiple Points to the drawing, you can also use the Multiple Command:
- Type on the command line MULTIPLE
- AutoCAD will ask to Enter command name to repeat: type in PO
- Start Adding points to the drawing
By default, the points will look like a single dot in the drawing. This is the default Point Style in AutoCAD. To select those points you need to have your Osnap Node option turned on.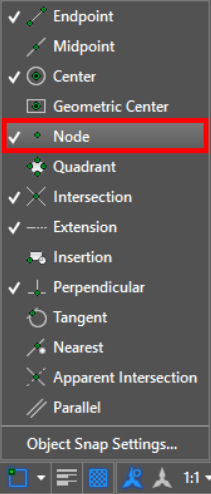
How to Edit Point Style in AutoCAD using Point Style Options
The Default Point Style of single Dot is tidy and can be useful in some cases, but more often than not, it is hard to work with. That is why often you will want to change the Point Style to something more appropriate.
To Change the default AutoCAD Point Style, type on the command line PTYPE. A window will pop up called Point Style. Here you can choose from preset Point Styles and/or and change the size of the points. After you’ve made your choice hit OK.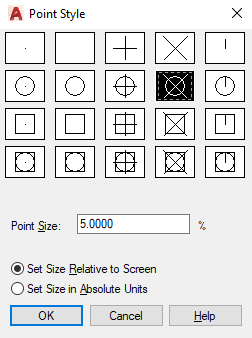
The size of the points can be set, either to be a percentage Relative to Screen view, or it can be set in Absolute Units.
When the Relative to Screen option is used, when zooming in and out, the point size resets its size with respect to the current drawing area on the screen.
Note: Using the RE command will regenerate the drawing objects.
If you would like to have your points in a Custom Size, not changing when zooming in/out then choose the Absolute Units option. When it is selected, points stay the same size, no matter what you do on the screen.
Note: First two Point Styles are not changed by setting the Size of points.
The Blank point style can be very useful when you want to temporarily hide the points from view.
How to Quickly Change Point Styles using Commands
There is another way to change the Point Type and Size. Bt using two Commands, PDMODE and PDSIZE.
To change the Size of the Points in AutoCAD quickly, type in the command line PDSIZE. When AutoCAD asks to Enter new value for PDSIZE, type in the new Point Size Value.
Point Type can be quickly changed by typing in the command line PDMODE. Then type in the value of the Point Style you would like to use.
Point Style values are “0” for a dot, “1” for blank point style, “2” for Plus point type, and so on. Check out the following image for the other point PDMODE values.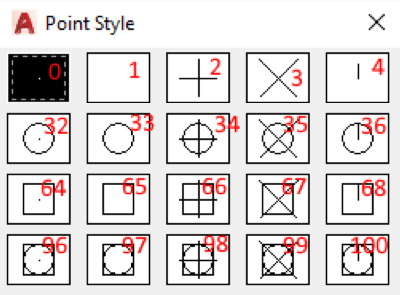
If you already have points in the drawing, their point styles will be automatically changed when you change the Style or Size of the Points.
Let us know if you liked our explanation. You can also ask additional questions in the comments below.
Don’t forget to check out our other AutoCAD related Posts and share this post with your colleagues!