

Insert an Image into the Drawing
Many times we have to put an image into our drawings. Sometimes it can be used just as a temporary reference, other times an image can be used to portrait the Logo of designer, contractor, etc.
The fastest way to insert an Image into a drawing is just to drag and drop it inside the drawing. By using this method we are creating Raster Image object which is an external reference into our drawing. This is great method if we want to have good background image for example and we want to control some of it’s properties like Brightness, Contrast, Fade and Background Transparency. Since our image is referenced in our drawing, AutoCAD needs to know the path to the image file. If you want to learn more about different path types of external references you can click here: Xref – choosing our Path Type, or you can check out our full guide related to External references in AutoCAD.
Numerous times I have forgotten to send the image which is attached into the drawing and after day or two I receive mad phone call from colleague who can’t find my image.. That’s why the best way of sending drawings is by using eTransmit. However if you are using an image for something not so graphically important like Logo for example. There is second way to insert it into the drawing, without the need of sending it.
Insert image as OLE Object.
Object linking and embedding is a way to use information from one application in another.
Embed object is a copy of information from another document. There is no link to the source document and any changes made to the source document are not reflected in destination documents.
Link Object is a reference to information in another document. There is a link between documents and any changes made to the source document will be reflected in destination documents.
So if we embed a raster image in a drawing file as an OLE object, the image will be saved in the .dwg file. To do that we have to go through 6 simple steps:
- Firstly we have to open the image in Image Editing application, such as Microsoft Paint.
- Then we will have to select our image. To do that we simply press CTRL + A or we can select just a portion of it.
- After selecting the image we Copy it by pressing CTRL + C
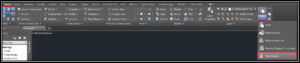
- Now we go into AutoCAD and under Home ribbon we can see Paste button. From the drop down menu we choose Paste Special.
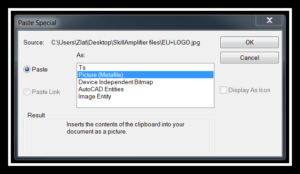
- In Paste Special dialog box, we select the options Paste and Picture (Metafile) and then click OK.
- Now we just have to place the image in our drawing.

That’s it now the image is saved in the .dwg file and we don’t have to worry about breaking the path or sending the drawing without image file.