

If you are working in the field of Civil Engineering or Land Surveying you probably faced the problem of Assigning Elevations to Polylines.
The most common situation is when you have to use someone’s existing drawing and they exploded everything. Or have flattened the contours and now all the polylines have Elevation 0.
The second common situation is when you have to vectorize Topographic Map. Maybe you are using some software like Raster Design that helps you automatically draw the contours, but after that, you have to Set Elevations to them!
No matter how you end up with Polylines having Elevation 0 or something wrong, here you will find the fastest ways to get the work done!
Assign Elevations using included Tools
As always we are starting with the basic method, and that is assigning elevations manually without using Additional tools.
Using Properties
The easiest way that I bet everyone is familiar with is to pick the Polyline. Open Properties eighter by clicking with the right click and then going to Properties, or hit CTRL + 1 (Learn the 15 most useful shortcuts that will accelerate your work!). In the properties menu under Geometry, you will find Elevation, just type in the desired elevation and you are ready!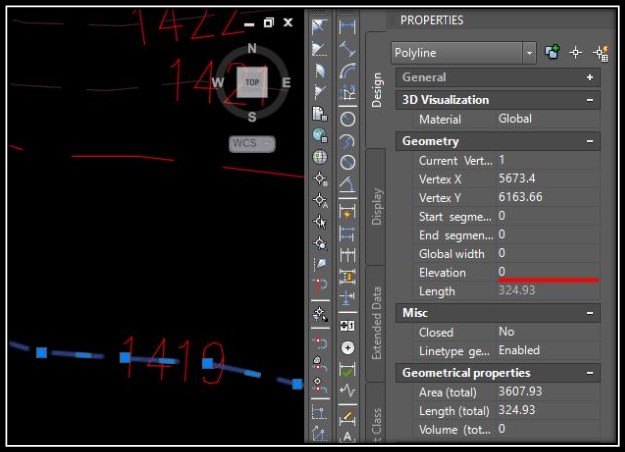
Using AutoCAD Civil 3D Tools
If you are using Civil 3D, there is one hidden tool that can accelerate that process!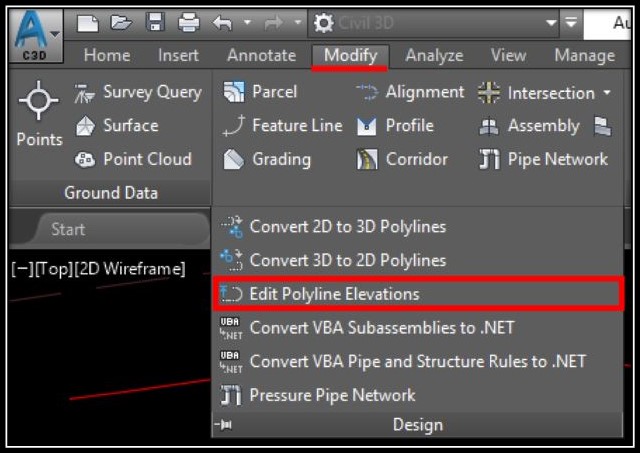
In Modify tab under Design, you will find Edit Polyline Elevations. The tool can be triggered by typing in command line EDITPLINEELEVS. After starting the command AutoCAD will ask you to select a polyline. After selecting the polyline you will be asked to Specify Elevation. When you type in the desired elevation and hit Enter, AutoCAD will automatically ask you to select next polyline. That way you can save a lot of clicks!
Set Polyline Elevations Incrementally
After using those two methods imagine a way to set the first elevation and then incrementally change all other Elevations just by clicking on them! Sound great doesn’t it? Thanks to a colleague from Autodesk’s forum named bob.at we are able to do just that! Just follow these simple steps:
- Download the lisp from here and load it using APPLOAD command. Before proceeding set an Elevation to one of the polylines, so you can use it as a reference later on!
- To start the lisp type in SETELEV.
- First, you will be asked to set Layer Prefix. If you want the contour to stay on the same layer just hit Enter. However, if you type in a prefix, for example, “NEW-” the lisp will create a new layer with the same settings as the polyline’s layer but with the prefix NEW-your layer!
- After setting the Prefix and hitting enter, AutoCAD will ask you to select an increment. Type in your increment with a positive sign. If you want to set elevations in descending order the lisp will give you that option on the next step!
- Next step is to select reference polyline. After selecting it you will be asked to choose eighter Increase or Decrease. Your choice depends on whether you want to assign your elevations in Descending or Ascending order.
- Now the Lisp will Automatically calculate the next Contour elevation depending on your previous choices (The reference polyline, Increment and Increase or Decrease order). So you have to just click on your next polyline!
- AutoCAD will ask you again if you want to continue with your Increasing order or you want to change to Decreasing. Just make your choice and hit Enter, then continue forward!
That way you can save lots and lots of time!
Set Polyline Elevations Automatically using Text or Mtext
This is by far the most automated method that I have found and it works great. Especially when you have contours with 0 Elevation from someone else and text or mtext displaying their elevations.
The lisp is created by Juan Villarreal and it Automatically elevates the polylines based on the associated elevation text label (works with Text and Mtext objects). Routine searches elevation labels as each one is encountered, a selection is attempted using a starting distance/radius, increment, and max distance/radius. If the initial selection fails, the distance radius is Increased until either a polyline is selected or the maximum distance is reached. When a polyline is found its elevation is made to match the found elevation label.
To use the Magic fallow these simple steps:
- Download the lisp from here and load it using APPLOAD command.
- To start the lisp type in AEV.
- You will be asked for Starting Radius. This depends on units you are using, but considering most of you are going to use Feet or Meters 0.5 will do just Fine.
- After that, you will be asked to select an Increment for the radius. Just type in the same number.
- Lastly, you will be asked to enter Maximum Radius.
- Hit Enter and you are ready! All the Polylines have assigned Elevations!
Note: If you have frozen layers having text in them under your Polylines, you’d better clear them before proceeding ,they might cause problems!
If you know more interesting methods of setting Polyline’s elevations, share them with us in the comment section below!